Microsoft has two very nice tutorials on using Frontpage for building web pages and sites. You can find these tutorials here for your specific software: FrontPage 2000, or FrontPage 98. The tutorials create different kinds of pages, you might want to review them both.
I have copied a few parts from the 2000 tutorial below, covering creating a new site, sharing Borders, setting up Navigation for your site, and applying a Theme to the site. I went thru these topics very quickly in the class, so here is a detailed set of instructions. However, I recommend going completely thru the full tutorials, they are quite good. For example we didn't cover (and it isn't covered below) how FrontPage can automatically manage and repair hyperlinks, organize files and folders, check spelling across all pages in the Web site, and generate reports that point out problems with your pages and files.
Creating a Web with FrontPage
A Web site is the collection of a home page and its associated pages, graphics, documents, multimedia, and other files. Web sites are stored on a Web server or on a computer's hard drive. FrontPage-based Web sites also contain files that support FrontPage-specific functionality and allow Web sites to be opened, copied, edited, published, and administered with FrontPage.
In the previous procedures, you learned how easy it is to create a Web page with FrontPage. As soon as you start the application, you can start typing and editing, then save the document to your hard drive -- much like a word processor. While you can certainly choose to put together an entire Web site like this, it can take a lot of manual work and attention to detail to maintain hyperlinks and source files, and keep your content up to date.
When you save your pages to a Web site, FrontPage can automatically manage and repair hyperlinks, organize files and folders, maintain dynamic navigation bars, check spelling across all pages in the Web site, and generate reports that point out problems with your pages and files.
To create a new Web site
How do I make a new Web site?
- On the File menu, click Close to close the current page.
- On the File menu, point to New, and then click Web.
FrontPage displays the New dialog box. Here, you can choose from several Web site templates and wizards, specify where you want to save your Web site, and what you want to call it.
- Make sure the One Page Web template is selected, and then press
TAB.
Pressing the TAB key moves the selection to the field where you specify the name and location of the new Web site.
- In the Specify the location of the new Web box, change the
suggested name to C:\My Documents\My Webs\Millennium and then click
OK.
FrontPage creates a new Web site named "Millennium" and displays its name in the title bar at the top of the FrontPage application window. Because you'll be working with several files in your Web site, FrontPage also displays the Folder List, where you can see the files and folders in your current Web site, similar to files and folders in Windows Explorer. You'll learn how to use the Folder List later, in Lesson 2.
 Navigation icon
 - Click the Navigation icon on the Views bar.
When you have a Web site open, the icons on the Views bar let you look at the information in your Web site in different ways.
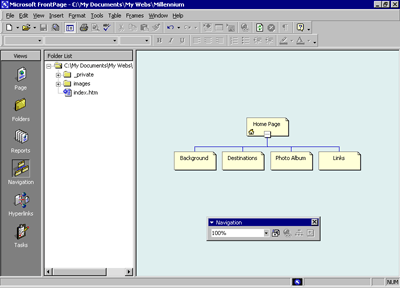
Navigation view shows a graphical representation of the structure of your Web site. Because you created a one-page Web site, FrontPage has automatically designated it as the Web site's home page -- indicated with a small icon of a house. While in Navigation view, FrontPage also displays the Navigation toolbar, which you can drag anywhere on your screen.
Next to the Views bar, FrontPage displays the optional Folder List, just like it did in Page view.
In a moment, you'll replace the new, empty home page with the one you created earlier in this lesson. First, however, you'll create the structure for the other four pages that the Millennium Celebration Web will have.
Creating a Web site structure in Navigation view enables features such as page banners and navigation bars that are automatically updated whenever you change, add, or remove pages in your Web site. This makes it easy to change things around. You'll learn more about these features later.
To create a navigation structure
- In Navigation view, click the New Page button on the toolbar.
FrontPage creates a new page labeled "New Page 1" below the home page. Pages in Navigation view aren't the actual pages in the current Web site; they are placeholders that point to them. This way, you can easily experiment with the structure and organization of a Web site before you create its content.
- To quickly create the remaining three pages, hold down CTRL on your
keyboard and press N three times.
CTRL+N is a keyboard shortcut for the New Page command. FrontPage supports common Windows and Microsoft Office accelerator keys that help speed up repetitive tasks. The pages you just created appear below the home page, because the home page was selected when you issued the command.
In Navigation view, the selected page is blue, while others are yellow.
- With the home page still selected, press TAB.
Pressing the TAB key moves the selection to the next page in the structure and activates the page title for editing.
- When New Page 1 is selected, type Background and then press
TAB.
"Background" is the page title of one of the pages you'll create for the Millennium Celebration Web. Next, you'll specify the page titles for the other pages.
- When New Page 2 is selected, type Destinations and then press TAB.
- When New Page 3 is selected, type Photo Album and then press TAB.
- Finally, when New Page 4 is selected, type Links and then
press ENTER.
Pressing ENTER after editing a page title saves the new title without selecting another page. To deselect all pages, click anywhere outside the pages in Navigation view.
Your screen should now look like this:

You can add new pages in Navigation view by right-clicking a page and choosing the New Page command from the shortcut menu. This command will create a new page below the selected page.
You can quickly open pages in Page view for editing by double-clicking the pages in Navigation view or in the Folder List.
Next, you'll replace the blank home page FrontPage created from the Web site template by importing the home page you created and saved to your My Documents folder earlier in this lesson.
To import a page into a Web site
How can I insert a file on my page?
- In Navigation view, double-click the Home Page to open it in Page
view.
FrontPage opens the blank home page that was created from the Web site template.
 Folder List button
 - On the toolbar, click the Folder List button to hide the Folder List in Page view.
- On the Insert menu, click File.
FrontPage displays the Select File dialog box. Here, you can insert Web pages, word-processing documents, text files, and other documents on the current page.
- In the Select File dialog box, navigate to the My Documents folder.
- When My Documents is displayed in the Look in list of
the Select File dialog box, click the file named homepage, and
then click Open.
FrontPage imports your previously saved home page to the current page.
 Save button
 - To save the current page to your Web site, click Save on the
File menu, or click the Save button on the toolbar.
FrontPage displays the Save Embedded Files dialog box. Here, you can preview, rename, save, and update embedded files that the current Web site will use.
When you previously saved this page to the My Documents folder on your file system, FrontPage left the two pictures you inserted in their original location -- the FrontPage Tutorial folder. The home page merely pointed to the picture files without copying them to the same folder the page was saved to. To keep Web sites portable, however, you should always keep associated pages and files as part of the Web site that uses them.
- In the Save Embedded Files dialog box, click OK.
FrontPage saves the home page as Index.htm and saves copies of the embedded picture files, 2000.gif and Fp2000.gif, to the current Web site.
FrontPage will automatically name home pages one of two reserved names that you should not change unless you need to. If you are running local Web server software such as Microsoft Personal Web Server or Internet Information Services (IIS) on your computer, the home page will be named Default.htm. If you do not have a local Web server installed, or when you save a page to your local hard drive instead of a Web site on a Web server, the home page will be named Index.htm.
These names are reserved for home pages because Web browsers will automatically look for them when a site visitor types the URL to your Web site without a specific page reference.
Adding Shared Borders and Navigation Bars
For the Millennium Celebration Web, you will let FrontPage manage the hyperlinks that site visitors will click to move around the pages in your Web site. FrontPage achieves this with a combination of two powerful features: shared borders and automatic navigation bars.
Shared borders are page regions reserved for content that you want to appear consistently throughout the pages in your Web site. These borders can contain page banners and navigation bars. Page banners display the page title you gave each page when you created or saved it. Navigation bars are a row or column of hyperlinks to the other pages in the current Web site. FrontPage can automatically update shared borders and navigation bars, so the navigation structure of your Web site will always work correctly, even when you add, move, or delete pages from the Web site's structure.
In Lesson 1, you already completed the first step required for automatic navigation bars: creating the basic Web site structure in Navigation view. Because you have already done this, you'll now enable shared borders throughout your Web site.
To create shared borders across a Web site
- Click the Navigation icon on the Views bar to switch to Navigation view.
- Click the Folder List button to hide the Folder List in this view.
- On the Format menu, click Shared Borders.
 In the Answer Wizard, type:
How do I insert shared borders on pages?FrontPage displays the Shared Borders dialog box. Here, you can specify where on your pages FrontPage should insert shared borders. Because your Web site structure has two levels of pages -- the home page and the pages below it -- you will use two kinds of shared borders and two kinds of navigation bars.
- In the Shared Borders dialog box, make sure the All pages option is selected.
- For a horizontal shared border, select the Top check box and select the Include navigation buttons check box just below it.
- For a vertical shared border, select the Left check box and select the Include navigation buttons check box below it.
- Leave the Right and Bottom check boxes unchecked, and then
click OK.
FrontPage creates shared borders and default navigation bars for all the pages in the current Web site. You'll see what these look like when you return to Page view.
Next, you'll customize the appearance of the default navigation bars. Because they are shared across all pages in the current Web site, you can change their properties on any page and the change will be reflected across the entire Web site.
To test navigation bar hyperlinks
- In Navigation view, double-click the Home Page.
- Click the Folder List button to hide the Folder List in Page view.
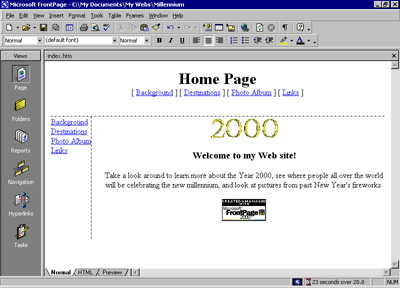
Note the changes FrontPage has made to the home page. It now contains a top and left shared border. The top border contains a page banner with the name of the current page, and the left border contains a list of navigational hyperlinks that look exactly like the ones you manually created at the beginning of this lesson.
In Page view, you can easily test hyperlinks that point to pages and files in your Web site.
 In the Answer Wizard, type:
How can I test a hyperlink? - Hold down CTRL and then click the first navigational hyperlink named
Background on the left side of the page.
FrontPage opens the page the hyperlink points to. On the Background page that is now open, shared borders and navigation bars have also been inserted. On this page, however, the links to the other pages are displayed in the top border, just under the page banner. This is because FrontPage uses the Web site structure you created in Navigation view to determine the level the current page is on.
By default, the top shared border points to pages on the same level as the current one, whereas the left border points to pages below the current one. In the next section, we'll change this default to another design.
To customize navigation bars
- On the Window menu, click index.htm.
FrontPage brings the home page back into view.
- In the top border of the home page, double-click the text that reads
Edit the properties for this Navigation Bar to display hyperlinks here.
 In the Answer Wizard, type:
How do I make a navigation bar?Double-clicking a navigation bar opens the Navigation Bar Properties dialog box. Here, you can customize the appearance of a navigation bar and the hyperlinks it creates.
Currently, the horizontal navigation bar is set to link to pages on the same level. Since the home page is on its own level in your navigation structure of your Web site, there are no other pages on the same level. FrontPage therefore doesn't show any navigation bars in this shared border.
For the Millennium Celebration Web, we want to have a horizontal navigation bar on the home page and vertical navigation bars on the other pages. To do this, we'll change the default setup of both navigation bars. You can make these changes on the current page and they'll be reflected throughout your Web site.
- In the Navigation Bar Properties dialog box, click Child
level, clear the check boxes for Home page and Parent page,
and then click OK.
FrontPage creates a navigation bar with hyperlinks to all the pages below the home page level.
- Press HOME to deselect the navigation bar.
Your page should now look like this:

Note that the left navigation bar still contains the same set of hyperlinks as the top navigation bar. In the next steps, you'll remove the obvious redundancy, and format the left navigation bar so it is displayed only on the other pages that the home page points to.
- In the left border of the home page, double-click the vertical navigation bar.
- In the Navigation Bar Properties dialog box, click Same
level, select the Home page check box, and then click OK.
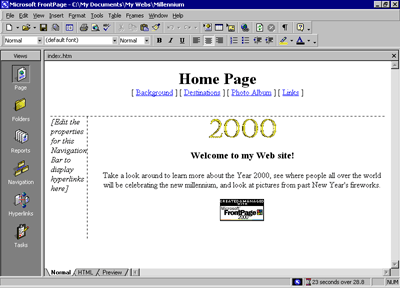
FrontPage changes the navigation bar to the placeholder text that reads "Edit the properties for this Navigation Bar to display hyperlinks here." This text is only shown in Page view while you work; it will not appear in a Web browser.
By pointing the hyperlinks in this navigation bar to the same level as the home page, you are effectively removing the hyperlinks from the left border, because there are no pages on the same level as the home page. This also removes the redundancy between the horizontal and vertical navigation bars.
- To save the home page, click Save on the File menu, or click the Save button on the toolbar.
Your page should now look like this:

- On the Window menu, click background.htm.
FrontPage brings the Background page back into view.
Note that the changes you've made on the home page to both the horizontal and vertical navigation bars are automatically reflected here, as well as on all the other pages in your Web site.
 Excluding pages from navigation bars By default, all pages in
your Web site's navigation structure are included in navigation bars. You can
select pages to be excluded from your navigation bars by right-clicking the
page in Navigation view and deselecting Included in Navigation
Bars on the shortcut
menu.
Applying a Theme
Although the addition of pictures, lists, forms, shared borders, and navigation bars has given the pages in the Millennium Celebration Web a more streamlined and organized look, you may wonder what to do about the rather bland appearance of black and blue text on a white background. After all, this Web site is about celebrating an event. You want the pages to look more lively and fun.
Imagine how time-consuming it would be if you had to design a color scheme for text and graphics, and create graphical page banners, navigation buttons, list bullets, and background textures for all the pages in your Web site. Now imagine how many more custom graphics you would need to create if you maintained more than one Web site and you didn't want any of your Web sites to look the same.
FrontPage includes more than 50 professionally designed themes with matching color schemes that you can apply to any or all pages in your Web site. A theme consists of design elements for bullets, fonts, pictures, navigation buttons, and other graphics. When applied, a theme gives pages, page banners, navigation bars, and other elements of a Web site an attractive and consistent appearance.
To apply a theme to the Millennium Celebration Web
- On the Window menu, click index.htm.
FrontPage brings the home page back into view.
 In the Answer Wizard, type:
How do I apply a theme to my Web site? - On the Format menu, click Theme.
FrontPage displays the Themes dialog box. Here, you can select from a list of themes that FrontPage installed by default, or choose to install the complete set of themes from your FrontPage 2000 CD-ROM. You can make choices about the appearance of the theme, preview theme elements, and modify the selected theme.
- Click on some of the different theme names in the scrolling list box.
When you click the name of a theme, the Sample of Theme window shows a sample of the graphical elements that are contained in the selected theme. This way, you can first preview a theme before applying it to selected or all pages in your Web site.
Before applying a theme, you can select theme options that affect the appearance of the theme's components. For example, selecting Vivid colors applies brighter colors to text and graphics, selecting Active graphics animates certain theme components, and selecting Background picture applies a graphical background to the pages in your Web site. You can also choose to apply a theme as a cascading style sheet (Apply using CSS).
For the Millennium Celebration Web, you'll clear these defaults.
- Under Apply theme to, make sure All pages is selected.
- In the list of installed themes, click Artsy.
- Clear the check boxes for Active graphics and Background
picture, then click OK to apply the theme.x
Since this is the first time you're applying a theme to a Web site, FrontPage displays a message to let you know that applying a theme will overwrite some of the manual formatting you may have done on your pages.
We've purposely not included much manual design work in this tutorial, so you can acknowledge this message and proceed to apply the theme.
- Click Yes to apply the theme.
The theme named "Artsy" is applied to all the pages in your current Web site.
- To save the home page, click Save on the File menu, or click the Save button on the toolbar.
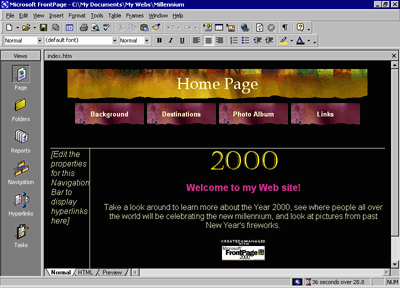
Your page should now look like this:

As you can see, applying the theme has dramatically changed the appearance of the home page. The page banner and navigation buttons are no longer plain text; now they're colorful graphics. The page background has changed from white to black, which simulates the night sky that the millennium fireworks will appear in, and the font has changed color and is a little larger.
Displaying graphical navigation buttons on all pages
- On the Window menu, click background.htm.
FrontPage brings the Background page back into view.
Note that the page has inherited its theme and theme elements from the home page, but the vertical navigation bar in the left border still shows plain text hyperlinks. By default, vertical navigation bars are displayed as plain text, so they look this way even after you apply a theme. You can easily change navigation bar settings even after a theme is applied.
- In the left border of the Background page, double-click the vertical navigation bar.
- Under Orientation and appearance in the Navigation Bar Properties dialog box, click Buttons, and then click OK.
- Click anywhere on the page to deselect the navigation bar.
FrontPage changes the navigation formatting and uses the graphical buttons included with the theme. The Web site now has an attractive and professional look.
- To save the page, click Save on the File menu, or click the
Save button on the toolbar.
 Some themes contain animations
When you apply a theme, you can select Active graphics to enable page banner animations and navigation bar rollover effects, if the theme contains such elements. The theme sample will not show you what these effects look like. To see a theme's active graphics effects, apply the theme and then display the page in the Preview tab, or click the Preview in Browser command on the File menu.